Chocolate Wafer Rolls Recipe Easy Homemade Dessert
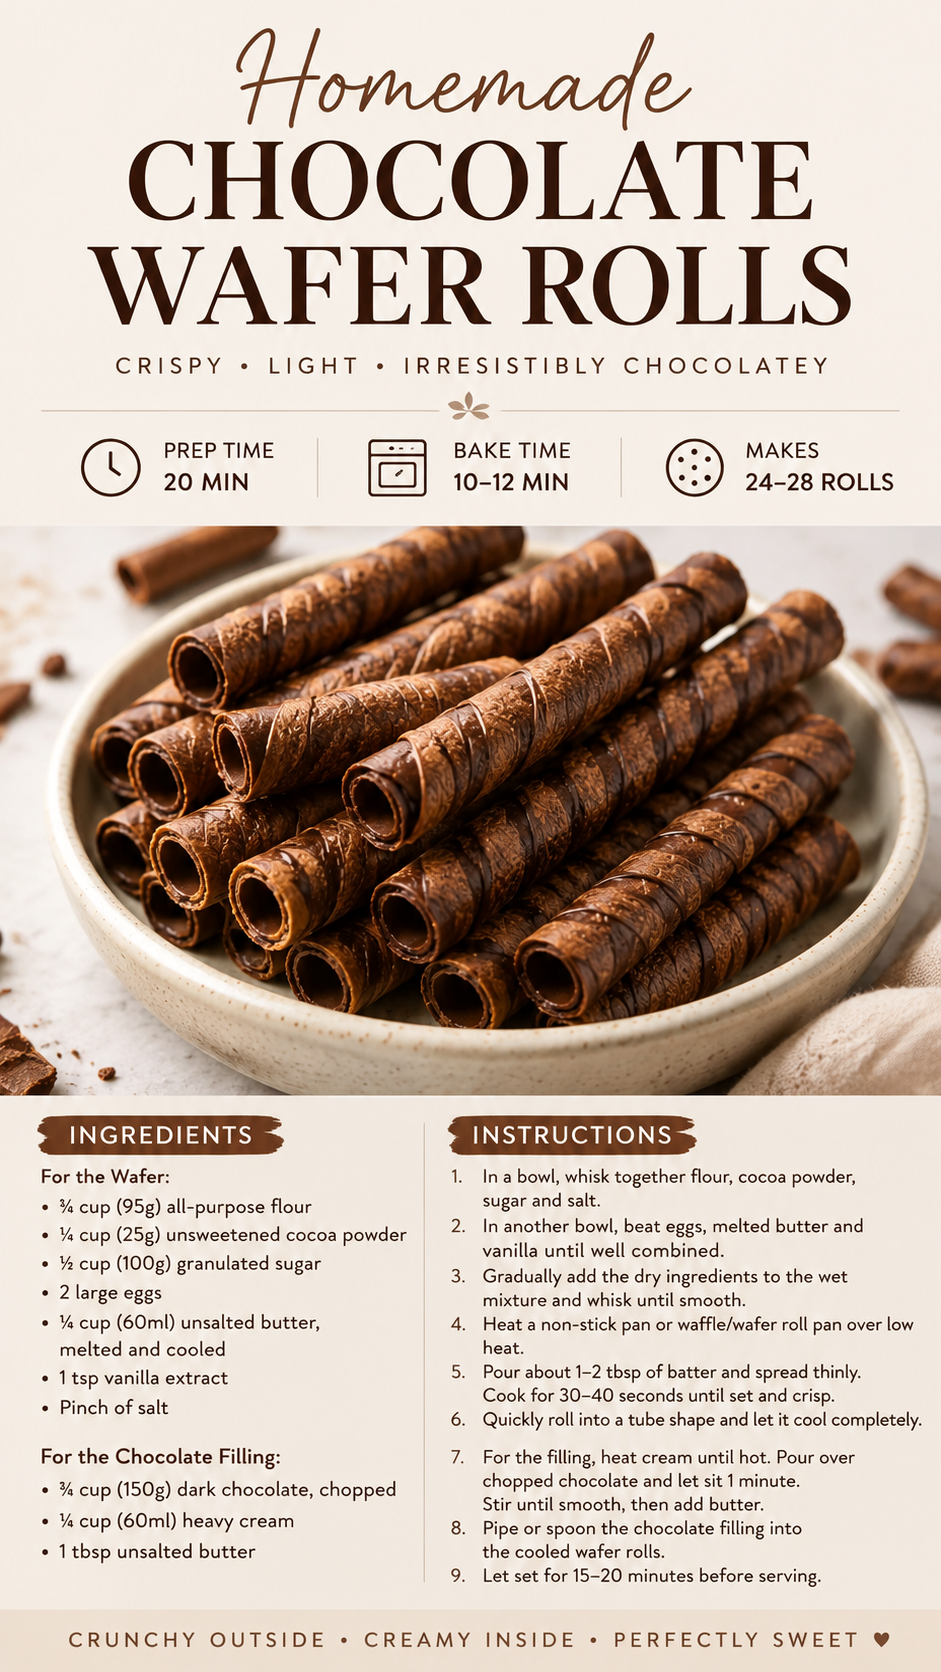
There is something irresistible about a tray of homemade chocolate wafer rolls. These crisp, delicate tubes have a deep chocolate flavor, a light crunch, and a wonderfully elegant appearance that makes them feel special without requiring complicated baking techniques. This chocolate wafer rolls recipe is a great choice when you want a homemade dessert that looks impressive, tastes rich, and can be filled with a smooth chocolate cream.
Key Takeaways
- Make crisp, thin chocolate wafers with everyday baking ingredients.
- Roll the wafers while warm so they form neat tubes without breaking.
- Use dark chocolate, cream, and butter for a rich homemade filling.
- Keep the batter thin for a lighter, crunchier wafer texture.
- Prepare these chocolate rolls for parties, afternoon treats, or special desserts.
What Makes Chocolate Wafer Rolls So Special?
Chocolate wafer rolls combine two textures that work beautifully together: a crisp baked shell and a creamy chocolate center. The wafers are thin enough to have a delicate snap, while cocoa powder gives them a warm, chocolate-forward taste. Once filled, each roll becomes a bite-sized dessert with plenty of texture and flavor.
They are also surprisingly versatile. You can serve them as part of a dessert platter, pair them with ice cream, or arrange them alongside coffee and tea. Because the finished rolls look elegant, they are especially useful when you want a simple homemade dessert to have a more polished presentation.
Important: The most important part of making wafer rolls is timing. The baked wafer needs to be flexible enough to roll, so shape it promptly while it is still warm. Once it cools completely, it becomes crisp and much harder to shape.
Chocolate Wafer Roll Ingredients
The recipe shown features a straightforward wafer batter made with flour, unsweetened cocoa powder, sugar, eggs, butter, vanilla, and a pinch of salt. The filling uses dark chocolate, heavy cream, and butter for a smooth and indulgent finish.
For the Chocolate Wafer
- 3/4 cup (95g) all-purpose flour
- 1/4 cup (25g) unsweetened cocoa powder
- 1/2 cup (100g) granulated sugar
- 2 large eggs
- 1/4 cup (60ml) unsalted butter, melted and cooled
- 1 teaspoon vanilla extract
- A pinch of salt
For the Chocolate Filling
- 3/4 cup (150g) dark chocolate, chopped
- 1/4 cup (60ml) heavy cream
- 1 tablespoon unsalted butter
These ingredients create a balanced base with enough cocoa flavor to complement the chocolate filling without making the dessert overwhelmingly sweet. Using unsweetened cocoa powder also gives you control over the sweetness of the wafer itself.
How to Make Chocolate Wafer Rolls
The process is simple, but wafer rolls reward careful attention to thickness and temperature. The goal is to spread the batter into a thin layer, bake it until set and crisp around the edges, and then roll it immediately.
- Prepare the dry ingredients. In a bowl, whisk together the all-purpose flour, cocoa powder, sugar, and salt. Mixing these ingredients evenly helps distribute the cocoa and prevents pockets of dry ingredients in the batter.
- Mix the wet ingredients. In another bowl, whisk the eggs, melted butter, and vanilla extract until well combined. Let the melted butter cool before mixing so it blends smoothly with the eggs.
- Combine the mixtures. Add the dry ingredients to the wet ingredients and whisk until the batter is smooth. Avoid overmixing once the flour has been incorporated.
- Heat your cooking surface. A non-stick pan or waffle or wafer roll pan can be used over low heat. A controlled, gentle temperature helps the thin batter cook evenly.
- Spread the batter thinly. Pour approximately 1 to 2 tablespoons of batter onto the heated surface and spread it into a thin layer.
- Bake or cook until crisp. Cook for around 30 to 40 seconds, or until the wafer is set and crisp. The exact time can vary depending on the pan and heat level.
- Roll immediately. Quickly shape the warm wafer into a tube. Work carefully but efficiently, because the wafer will become firm as it cools.
- Cool completely. Allow the rolled wafers to cool before filling them. This helps preserve their crisp texture.
How to Get Thin, Crisp Wafer Rolls
The texture of chocolate wafer rolls depends heavily on how thin the batter is spread. A thick layer may remain soft in the center and can be difficult to roll neatly. A thin, even layer cooks quickly and produces the delicate crispness that makes wafer cookies so enjoyable.
Keep the heat relatively low and watch the wafers closely. Because they are thin, they can move from perfectly cooked to overly dark very quickly. If your first wafer is too soft, it may need slightly more cooking time. If it becomes too brittle before you can roll it, reduce the cooking time or work faster.
Expert Insight
- Spread each portion as evenly and thinly as possible.
- Roll the wafer immediately after cooking rather than waiting for it to cool.
- Let the finished tubes cool fully before adding the filling.
Making the Chocolate Filling
The filling is essentially a simple chocolate cream mixture. Start by heating the heavy cream until hot, then pour it over the chopped dark chocolate. Let the mixture stand for about one minute so the chocolate has time to soften.
Stir gently until the chocolate becomes smooth and glossy. Add the butter and continue stirring until completely incorporated. The result should be rich, creamy, and easy to pipe into the cooled wafer rolls.
Pro Tip: Chop the chocolate into small, similarly sized pieces before adding the hot cream. Smaller pieces melt more evenly, making it easier to achieve a smooth filling without overheating the chocolate.
Filling and Serving the Wafer Rolls
Once the chocolate rolls have cooled completely, transfer the filling into a piping bag. Pipe the chocolate mixture into the ends of each roll, filling them gently without applying too much pressure. This gives the dessert a neat appearance while keeping the crisp wafer intact.
You can also leave some rolls partially filled if you prefer a lighter chocolate center. Arrange the finished wafer rolls on a serving plate in rows or in a loose stack for a bakery-inspired presentation.
These chocolate wafer cookies are especially appealing when served with a warm drink. Coffee, espresso, tea, or a glass of cold milk can balance the richness of the chocolate and make the dessert feel even more complete.
Helpful Tips for Better Chocolate Wafer Rolls
Work Quickly While the Wafer Is Warm
This is the single most important technique. Freshly cooked wafers are flexible, which makes them easy to wrap around a small cylindrical shape. As they cool, they become crisp and firm. If a wafer becomes too stiff to roll, it is unlikely to form a clean tube without cracking.
Do Not Overfill
A little chocolate filling goes a long way. Overfilling can make the wafer difficult to handle and may overpower the crisp chocolate shell. Pipe enough filling to create a creamy center while allowing the wafer itself to remain part of the experience.
Keep the Batter Consistent
Try to use a similar amount of batter for every wafer. Consistent portions make it easier to achieve rolls that cook at the same rate and have a similar thickness. This also helps create a more attractive finished dessert.
Let the Rolls Cool Before Filling
Warm wafers can soften the chocolate filling and make the finished dessert less crisp. Cooling the shells completely first helps preserve the contrast between the crunchy exterior and creamy chocolate center.
Creative Ways to Enjoy Chocolate Wafer Rolls
Although the chocolate-filled version is delicious on its own, these homemade wafer rolls can become part of many different desserts. Place them beside scoops of vanilla or chocolate ice cream for added crunch. Crumble a few over pudding or mousse, or use whole rolls as decorative elements on a dessert plate.
For gatherings, arrange several rolls together on a platter. Their cylindrical shape naturally creates an attractive presentation, making them suitable for birthdays, afternoon tea, holiday dessert tables, or casual weekend baking.
You can also experiment with the presentation rather than changing the basic recipe. Dust the finished rolls lightly with cocoa powder, add a small drizzle of melted chocolate, or serve them with fresh berries for a colorful contrast.
Storage and Make-Ahead Tips
Because crispness is such an important part of wafer rolls, moisture is their biggest enemy. Store cooled, unfilled wafers in an airtight container and keep them away from humid areas. If possible, fill them closer to serving time so the shells retain their delicate texture.
If you prepare the chocolate filling ahead, keep it covered and allow it to reach a suitable piping consistency before filling the rolls. The exact texture may change as the chocolate cools, so gentle stirring can help make it smooth again.
At a Glance
- Prep time: About 20 minutes
- Cooking time: About 10 to 12 minutes
- Yield: Approximately 24 to 28 rolls
- Best texture: Thin, crisp, and freshly filled
- Key technique: Roll each wafer while warm
Conclusion
Chocolate wafer rolls are proof that an elegant dessert does not need a long list of complicated steps. With a simple cocoa wafer batter, a smooth dark chocolate filling, and careful attention to timing, you can create crisp homemade treats that look as beautiful as they taste.
The secret is to keep the wafers thin, cook them gently, and roll them while they are still warm. Once cooled and filled with chocolate cream, they become a satisfying combination of crunch and richness. Whether you make them for a special occasion or simply want an impressive homemade dessert for the weekend, this chocolate wafer rolls recipe is one worth saving and making again.
Tags
Chocolate Wafer Rolls Chocolate Desserts Wafer Cookies Easy Baking Homemade Desserts Chocolate Recipes Crispy Desserts Baking Ideas